如果又要重新装一次Linux的话..(自用Linux装机/配件指南)
最近装了好几回虚拟机,装出经验来了,在这里总结一下吧,以后说不定还会用到呢。
- 虚拟机:VMware WorkStations Pro
- 系统:Ubuntu 20.04
VMware
去官网下载并安装VMware。破解码网上有很多,随便查查就能通过了
下载系统iso
我这里用的是Ubuntu 20.04LTS,还是推荐直接去官网下载iso
安装系统
https://zhuanlan.zhihu.com/p/141033713
这个链接给的很详细了,我提几个自己觉得比较重要的点:
- 刚开始时选择典型,然后不需要在一开始时选定iso,而是在创建完成后在虚拟机选项里挂载iso。
- 安装Ubuntu还是建议English而非Chinese。中文缺点有二:
- 默认用户下的几个文件夹(
Desktop/Videos/Download/..)都是中文命名(桌面/视频/下载/..),有可能导致一些软件安装时识别不了中文路径 - 初次安装时,如果在一开始选择中文界面,会导致安装界面因为字体改变放大,然后你会看不到最下面的继续/后退选项()解决方法是按住
Alt+F7,拖动窗口()
- 默认用户下的几个文件夹(
与主机共享
理论上说在左上角虚拟机->设置->选项->共享文件夹里面一番操作后,就能在/mnt/hgfs下看到共享的文件夹名。但是事实上,我经常发现共享文件夹没有挂载成功,因此我最后得出的解决方案是,每次开机后手动挂载共享文件夹。下面这句百试百灵
1 | |
clash 挂梯子
到GitHub的release界面下载clash(命令行版,如果想装clash for Windows的GUI界面,参看我这篇),例如:
1
wget https://github.com/Dreamacro/clash/releases/download/v1.9.0/clash-linux-amd64-v1.9.0.gz将其解压到合适的目录下(假如你解压在了
~/Apps文件夹下),加上运行权限,并初次运行:1
2
3cd ~/Apps
chmod a+x clash-linux-amd64-v1.9.0 # the name is defined by yourself
./clash-linux-amd64-v1.9.0但此时还不够,需要修改
~/.config/clash下的config.yaml文件。从你的梯子里找到clash的配置文件,或者需要先查找一些将节点信息转成clash配置文件的工具,将其替换。
(还是很推荐bywave的)修改系统代理,打开右上角
Settings->Network,将proxy设为manual,同时将其设为: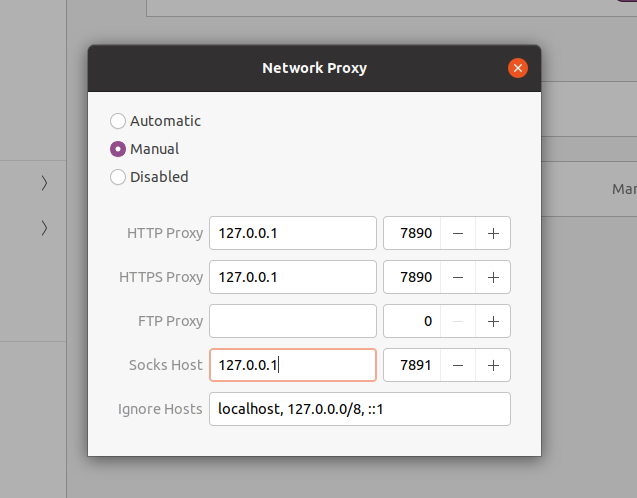
测试一下,打开www.google.com,看看行不行。
another link:https://zhaowen.site/wiki/clash%20for%20Linux.html
安装一些必备工具
1 | |
一些参考链接:
https://ohmyz.sh/#install
https://zhuanlan.zhihu.com/p/19556676
https://linuxize.com/post/how-to-install-gcc-on-ubuntu-20-04/
https://regding.github.io/ubuntu-zsh
https://www.jianshu.com/p/bb2e0f2fab3c
dotfiles
fork了一个大佬的dotfiles,其要义在于,通过symlink软链接,实现将所有配置文件都集成在~/dotfiles文件夹内,以便同步,减少每次单独配置的烦恼。
ps:此步骤不要直接使用,建议先阅读一下clone下来的配置文件的内容,选择自己需要的。
1 | |
Chrome
个人习惯于用Google账号同步各种信息,因此下载安装chrome还是必要的(可怜Firefox了!我知道你是个好浏览器!)
定位到该deb所在的文件夹位置,输入:
1
sudo dpkg -i chrome......deb # 文件名省略了哈!安装完成!
zsh plugins
auto suggestions(自动补全,真的人生必备插件!)
Clone this repository into $ZSH_CUSTOM/plugins (by default ~/.oh-my-zsh/custom/plugins)
1
git clone https://github.com/zsh-users/zsh-autosuggestions ${ZSH_CUSTOM:-~/.oh-my-zsh/custom}/plugins/zsh-autosuggestionsAdd the plugin to the list of plugins for Oh My Zsh to load (inside ~/.zshrc):
(我由于之前在dotfiles里已经配置过,因此这步可以直接跳过)1
2
3
4plugins=(
# other plugins...
zsh-autosuggestions
)Start a new terminal session.
syntax highlighting(语法高亮 有错误语法会高亮提示)
- ```bash
git clone https://github.com/zsh-users/zsh-syntax-highlighting.git
echo “source ${(q-)PWD}/zsh-syntax-highlighting/zsh-syntax-highlighting.zsh” >> ${ZDOTDIR:-$HOME}/.zshrc1
2
3
4
5
6
7
8
9
10
11
12
13
14
15
16
17
18
19
20
21
22
23
24
25
26
27
28
29
30
31
32
33
34
35
36
37
38
39
40
41
42
43
44
45
46
47
48
49
50
51
52
53
54
55
56
57
58
59
60
61
62
63
64
  - start a new terminal session


更多可以参考 https://juejin.cn/post/6844903598300610568


# vim plugins

- [`vundle`](https://github.com/VundleVim/Vundle.vim)插件管理

  1.   ```bash
  git clone https://github.com/VundleVim/Vundle.vim.git ~/.vim/bundle/Vundle.vim

  2. Put this at the top of your `.vimrc` to use Vundle. Remove plugins you don't need, they are for illustration purposes.
     (同上,已经通过dotfiles配置好了)

     ```text
     set nocompatible              " be iMproved, required
     filetype off                  " required

     " set the runtime path to include Vundle and initialize
     set rtp+=~/.vim/bundle/Vundle.vim
     call vundle#begin()
     " alternatively, pass a path where Vundle should install plugins
     "call vundle#begin('~/some/path/here')

     " let Vundle manage Vundle, required
     Plugin 'VundleVim/Vundle.vim'

     " The following are examples of different formats supported.
     " Keep Plugin commands between vundle#begin/end.
     " plugin on GitHub repo
     Plugin 'tpope/vim-fugitive'
     " plugin from http://vim-scripts.org/vim/scripts.html
     " Plugin 'L9'
     " Git plugin not hosted on GitHub
     Plugin 'git://git.wincent.com/command-t.git'
     " git repos on your local machine (i.e. when working on your own plugin)
     Plugin 'file:///home/gmarik/path/to/plugin'
     " The sparkup vim script is in a subdirectory of this repo called vim.
     " Pass the path to set the runtimepath properly.
     Plugin 'rstacruz/sparkup', {'rtp': 'vim/'}
     " Install L9 and avoid a Naming conflict if you've already installed a
     " different version somewhere else.
     " Plugin 'ascenator/L9', {'name': 'newL9'}

     " All of your Plugins must be added before the following line
     call vundle#end()            " required
     filetype plugin indent on    " required
     " To ignore plugin indent changes, instead use:
     "filetype plugin on
     "
     " Brief help
     " :PluginList       - lists configured plugins
     " :PluginInstall    - installs plugins; append `!` to update or just :PluginUpdate
     " :PluginSearch foo - searches for foo; append `!` to refresh local cache
     " :PluginClean      - confirms removal of unused plugins; append `!` to auto-approve removal
     "
     " see :h vundle for more details or wiki for FAQ
     " Put your non-Plugin stuff after this line
vim +PluginInstall +qall
- ```bash
YCM
代码补全神器,必备。
参考我的这篇
git authentication
通过generate access token或者SSH 免密登录解决。以后再更新吧..
https://blog.csdn.net/weixin_41010198/article/details/119698015
https://blog.csdn.net/qq_38163309/article/details/105335097
markdown editor
markdown写作还是必要的
https://github.com/brrd/abricotine
这款md的写作体验还是不错的。安装也很舒服,在release下找到Debian/Ubuntu的对应安装包,然后sudo dpkg -i ....deb就好了